@ tars / rpc
@ tars/rpc is the Tars RPC calling framework, which provides an infrastructure for making RPC calls between multiple server processes. It can achieve the following capabilities:
-
Use tars2node to translate the Tars file into client proxy class code for the client to call any Tars service.
-
After using tars2node to translate Tars files into server code, you can implement standard Tars service, which can be used by any client using Tars / TUP protocol Call directly.
-
Remote log, dye log, attribute report, alarm report and service communication.
-
Create a client proxy class for a custom communication protocol (such as a protocol using JSON format).
-
Create a server for a custom communication protocol (such as a protocol using JSON format).
-
Module: @ tars / registry, Function: According to the service Obj name, go to the master to query the IP list available for the service.
Tars RPC is divided into two parts, client and server:
-
The client part provides functions such as RPC proxy generation, message routing and network communication.
-
The server provides remote service exposure, request dispatching, and network communication functions.
Installation
npm install @ tar/rpc
A note on protocols and Tars files
Before in-depth knowledge of Tars, let’s clarify the relationship between the Tars encoding protocol, TUP packet protocol, and TARS packet protocol:
-
Tars encoding protocol is a data encoding and decoding rule. It encodes data types such as shaping, enumeration values, strings, sequences, dictionaries, and custom structures into binary data streams according to certain rules. After receiving the binary data stream, the opposite end deserializes according to the corresponding rules to obtain the original value.
-
Tars encoding protocol uses a type of unsigned char called TAG to identify variables. For example, the TAG value of a variable is 100 (the value is customized by the developer). When encoding the variable value, it also encodes the TAG value. When the opposite end needs to read the value of the variable, it looks for a data segment with a TAG value of 100 in the data stream, and after finding it, reads out the data part according to the rule, which is the value of the variable.
-
The positioning of the Tars encoding protocol is a set of encoding rules. The Tars protocol serialized data can not only be transmitted over the network, but also stored in a database.
-
The TUP packet protocol is an upper-layer encapsulation of the Tars encoding protocol and is positioned as a communication protocol. It uses the variable name as the keyword of the variable. When encoding, the variable name is packed into the data stream; when decoding, the corresponding data area is found according to the variable name, and the data area is deserialized according to the data type to obtain the original value.
-
The TUP packet protocol has a built-in <Map> type of Tars encoding protocol. The key of the <Map> is the variable name and the value is the binary data serialized by Tars encoding.
-
The data packet encapsulated by the TUP packet protocol can be sent directly to the Tars server, and the server can directly deserialize to get the original value.
-
The TARS packet protocol is a communication protocol encapsulated using the Tars encoding protocol for RequestPacket (request structure) and ResponsePacket (result structure). The structure contains important information such as the request sequence number, protocol type, and binary data after RPC parameter serialization.
For the encoding and decoding rules of the Tars encoding protocol and the writing method of Tars files, please refer to @tar/steam document.
When using, you can define the communication description file according to your needs, and then use the tars2node tool to convert the required code files. For specific instructions, please refer to the tars2node documentation .
Example
-
Clone this project.
-
Execute in the root directory of the project:
npm install -
Start the RPC server program in the
/rpc/examples/rpc-tars/demo.1/server.node.1directory:node main.js -
Start the RPC client program in the
/rpc/examples/rpc-tars/demo.1/client.node.proxydirectory:node main.js
Development steps
- Write a tars file that defines the constants, enumeration values, structures, functions, and other communication protocols used by the client to communicate with the server. We use the following Tars file as an example:
Generally speaking, Tars files are usually developed, maintained and provided by
server-side development.
module TRom
{
    struct User_t
    {
        0 optional int id = 0;
        1 optional int score = 0;
        2 optional string name = "";
    };

    struct Result_t
    {
        0 optional int id = 0;
        1 optional int iLevel = 0;
    };

    interface NodeJsComm
    {
        int test();

        int getall(User_t stUser, out Result_t stResult);

        int getUsrName(string sUsrName, out string sValue1, out string sValue2);

        int secRequest(vector<byte> binRequest, out vector<byte> binResponse);
    };
};
Save the above as: NodeJsComm.tars.
- Generate client call code from Tars file:
tars2node --client NodeJsComm.tars
- Writing client programs
// STEP01 Introduce system module and tool generated code
var Tars = require ("@ tars / rpc"). client;
var TRom = require ("./ NodeJsCommProxy.js"). TRom;

// STEP02 initialize Tars client
// This step is not necessary. The subsequent documents will introduce the conditions under which the [tars] .client.initialize function needs to be called and what it does
// The initialize function only needs to be called once, and globally available after initialization
// We don't need to use too many features in the demo program, so comment it out first
//Tars.initialize("./config.conf ");

// STEP03 Generates a server-side call proxy instance
var prx = Tars.stringToProxy (TRom.NodeJsCommProxy, "TRom.NodeJsTestServer.NodeJsCommObj@tcp -h 127.0.0.1 -p 14002 -t 60000");

// STEP04 client calls use the Promise mechanism for callbacks, here write success and failure callback functions
var success = function (result) {
	console.log("result.response.costtime:",    		result.response.costtime);
	console.log("result.response.return:",      		result.response.return);
	console.log("result.response.arguments.stResult:",  result.response.arguments.stResult);
}

var error = function (result) {
	console.log("result.response.costtime:",			result.response.costtime);
    console.log("result.response.error.code:",         	result.response.error.code);
    console.log("result.response.error.message:",       result.response.error.message);
}

// STEP05 Initialize interface parameters and start calling RPC interface
var stUser = new TRom.User_t ();
stUser.name = "tencent-mig";

prx.getall (stUser) .then (success, error) .done ();
Save the above code as client.js and use the following command to call the server.
node client.js
result.response.costtime: 7 result.response.return: 200 result.response.arguments.stResult: { id: 10000, iLevel: 10001 } As long as the corresponding Tars file is available, Tars services provided by C ++, Java, PHP, Node.js can be called.
- Generate server code based on Tars file:
tars2node --server NodeJsComm.tars
- Writing the server program
tars2node The tool will generate NodeJsComm.js and NodeJsCommImp.js.
Developers Do not need and try not to change NodeJsComm.js. This file mainly implements functions such as structure encoding and decoding, function parameter encoding and decoding, and function distribution.
Developers only need to fill in the RPC functions defined in NodeJsCommImp.js and implement the business logic.
var TRom = require('./NodeJsComm.js').TRom;
module.exports.TRom = TRom;

TRom.NodeJsCommImp.prototype.initialize = function ( ) {
    //TODO::

}

TRom.NodeJsCommImp.prototype.test = function (current) {
    //TODO::

}

TRom.NodeJsCommImp.prototype.getall = function (current, stUser, stResult) {
    //TODO::
// Initially, each RPC function is empty, and developers need to fill in the blanks to fill in the missing business logic here.
// After completing the business logic, the developer calls the current sendResponse function and returns the data to the caller.
// Note: The sendResponse of each function is different, and its parameters correspond to the return value and output parameters of the current function.
// If the current function has a return value, then the first parameter of current.sendResponse should be the return. The return value of the current function in the example is int, and we return 200 as an example.
// After solving the return value problem, we can write the current output parameters in order. The encoding and decoding of parameters and network transmission are addressed by the framework.

	stResult.id		= 10000;
	stResult.iLevel	= 10001;

	current.sendResponse(200, stResult);
}

TRom.NodeJsCommImp.prototype.getUsrName = function (current, sUsrName, sValue1, sValue2) {
    //TODO::

}

TRom.NodeJsCommImp.prototype.secRequest = function (current, binRequest, binResponse) {
    //TODO::

}
Next, create a service entry file. It is mainly responsible for reading configuration files, configuring ports, setting protocol parsers, starting services, and so on.
var Tars  = require("@tars/rpc").server;
var TRom = require("./NodeJsCommImp.js").TRom;

var svr  = Tars.createServer(TRom.NodeJsCommImp);
svr.start({
    name     : "TRom.NodeJsTestServer.NodeJsCommObjAdapetr",
    servant  : "TRom.NodeJsTestServer.NodeJsCommObj",
    endpoint : "tcp -h 127.0.0.1 -p 14002 -t 10000",
    protocol : "tars",
	maxconns : 200000
});

console.log("server started.");
Save the above code as server.js, and start it with the following command.
node server.js
Client initialization function
In the demo code we mentioned that initialize does not have to display the call, we can also set the parameters we need in other ways.
First we look at the format and necessary parameters of the configuration file:
<tars>
    <application>
        <client>
            locator = tars.tarsregistry.QueryObj@tcp -h 127.0.0.1 -p 14002 ## define master address
            async-invoke-timeout = 60000 ## Timeout of asynchronous call (ms)
        </client>
    </application>
</tars>
This configuration file is automatically generated by tarsnode. We mainly use tars.application.client.locator and tars.application.client.async-invoke-timeout.
When can I not call the initialize function? If we generate a server-side proxy, each server uses the direct connection mode, that is, the IP address specified in stringToProxy does not need to be initialized.
In addition to using the configuration file to set these two parameters, we can call [@tars/rpc] .client to expose the method for setting:
var Tars = require ("@ tars / rpc"). client;

Tars.setProperty ("locator", "tars.tarsregistry.QueryObj@tcp -h 127.0.0.1 -p 14002");
Tars.setProperty ("timeout", 60000);
The above calling method is equivalent to using the configuration file.
Tars service creation method
Tars has three methods to create a standard Tars service:
- Configuration file generated using
tarsnode:
Using this method is the same as using Tars C ++. We need to configure Obj for the service on the Tars management platform, and then automatically generate a configuration file containing the listening port by tarsnode when starting the program. The service framework depends on this configuration to bind the port Start the service.
The configuration file generated by tarsnode is similar to the following:
<tars>
	<application>
		enableset=n
		setdivision=NULL
		<server>
			node=tars.tarsnode.ServerObj@tcp -h 127.0.0.1 -p 14002 -t 60000
			app=TRom
			server=NodeJsTestServer
			localip=127.0.0.1
			netthread=2
			local=tcp -h 127.0.0.1 -p 10002 -t 3000
			basepath=/usr/local/app/tars/tarsnode/data/MTT.NodeJSTest/bin/
			datapath=/usr/local/app/tars/tarsnode/data/MTT.NodeJSTest/data/
			logpath=/usr/local/app/tars/app_log//
			logsize=15M
			config=tars.tarsconfig.ConfigObj
			notify=tars.tarsnotify.NotifyObj
			log=tars.tarslog.LogObj
			deactivating-timeout=3000
			openthreadcontext=0
			threadcontextnum=10000
			threadcontextstack=32768
			closeout=0
			<TRom.NodeJsTestServer.NodeJsCommObjAdapter>
				allow
				endpoint=tcp -h 127.0.0.1 -p 14002 -t 60000
				handlegroup=TRom.NodeJsTestServer.NodeJsCommObjAdapter
				maxconns=200000
				protocol=tars
				queuecap=10000
				queuetimeout=60000
				servant=TRom.NodeJsTestServer.NodeJsCommObj
				shmcap=0
				shmkey=0
				threads=5
			</TRom.NodeJsTestServer.NodeJsCommObjAdapter>
		</server>
		<client>
			locator=tars.tarsregistry.QueryObj@tcp -h 127.0.0.1 -p 14002:tcp -h 127.0.0.1 -p 14003
			refresh-endpoint-interval=60000
			stat=tars.tarsstat.StatObj
			property=tars.tarsproperty.PropertyObj
			report-interval=60000
			sample-rate=1000
			max-sample-count=100
			sendthread=1
			recvthread=1
			asyncthread=3
			modulename=TRom.NodeJsTestServer
			async-invoke-timeout=60000
			sync-invoke-timeout=3000
		</client>
	</application>
</tars>
We use this configuration file to create a service:
// STEP01 introduces key modules
var Tars = require ("@ tars / rpc");
var TRom = require ("./ NodeJsCommImp.js");

// STEP02 Create an instance of the service
// Note the configuration here. In a formal environment, use process.env.TARS_CONFIG to indicate the path of the configuration file
// That is: svr.initialize (process.env.TARS_CONFIG, function (server) {...});
var svr = new Tars.server ();
svr.initialize ("./ TRom.NodeJsTestServer.config.conf", function (server) {
    server.addServant (TRom.NodeJsCommImp, server.Application + "." + server.ServerName + ".NodeJsCommObj");
});

// STEP03 After initializing the service in the previous step, start the service
svr.start ();
- Display configuration server information
// STEP01 introduces key modules
var Tars = require ("@ tars / tars"). server;
var TRom = require ("./ NodeJsCommImp.js"). TRom;

// STEP02 Create an instance of the service
// Note that "endpoint" and "protocol" are mandatory options, and the format must be the same as the following example
var svr = Tars.createServer (TRom.NodeJsCommImp);
svr.start ({
    name: "TRom.NodeJsTestServer.AdminObjAdapetr",
    servant: "TRom.NodeJsTestServer.AdminObj",
    endpoint: "tcp -h 127.0.0.1 -p 14002 -t 10000",
    maxconns: 200000,
    protocol: "tars"
});

console.log ("server started.");
- From the configuration file generated by
tarsnode, select some services to start
// STEP01 introduces key modules
var Tars = require ("@ tars / rpc");
var TRom = require ("./ NodeJsCommImp.js");

Tars.server.getServant ("./ TRom.NodeJsTestServer.config.conf"). ForEach (function (config) {
    var svr, map;
    map = {
        'TRom.NodeJsTestServer.NodeJsCommObj': TRom.NodeJsCommImp
    };

    svr = Tars.server.createServer (map [config.servant]);
    svr.start (config);
});
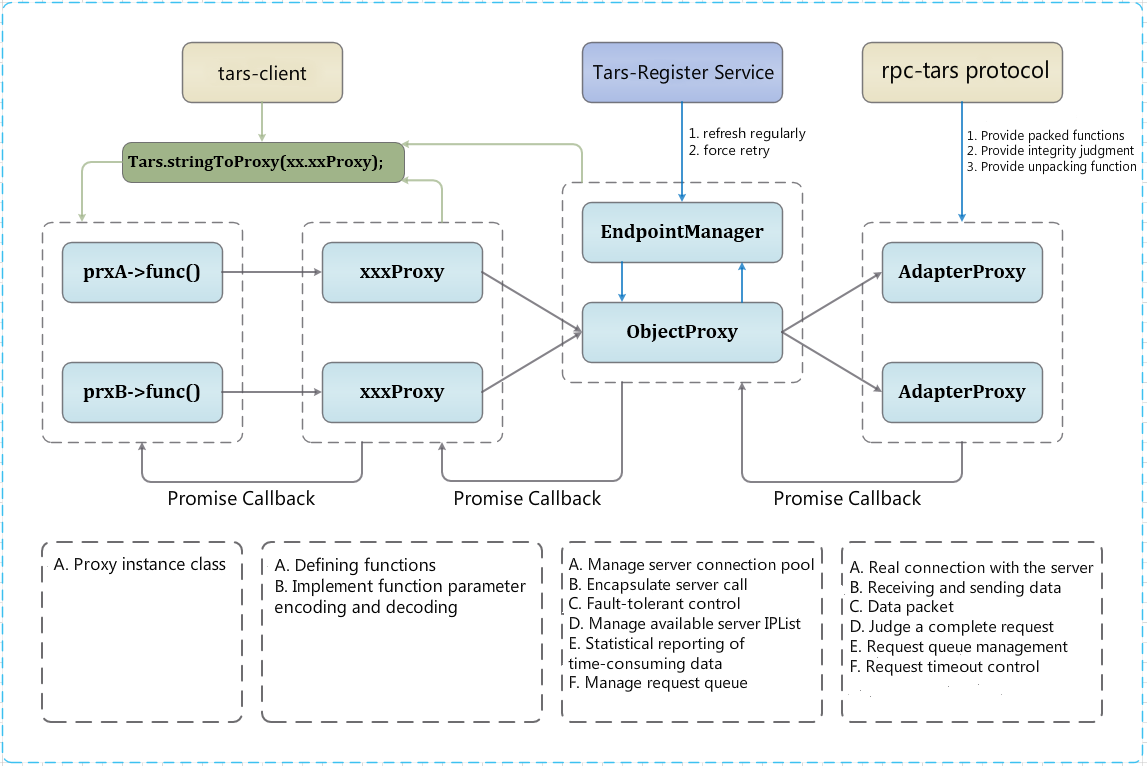
Tars client implementation principle
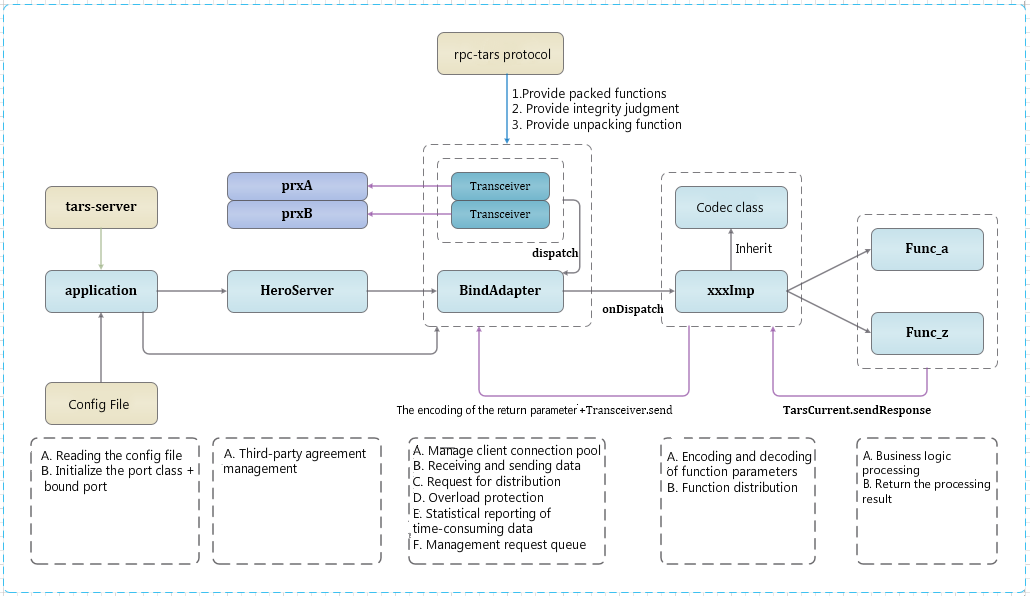
Tars server implementation
Tars calls a third-party protocol service as a client
We assume the communication protocol is in JSON format:
// Client-> Server
{
"P_RequestId": 0,
"P_FuncName": "test",
"P_Arguments": ["aa", "bb"]
}

// client <-server
{
"P_RequestId": 0,
"P_FuncName": "test",
"P_Arguments": ["ee", "ff"]
}
Implement protocol analysis class:
// Save the file as Protocol.js
var EventEmitter = require ("events"). EventEmitter;
var util = require ("@ tars / util");

var stream = function () {
    EventEmitter.call (this);
    this._data = undefined;
    this._name = "json";
}
util.inherits (stream, EventEmitter);

stream.prototype .__ defineGetter __ ("name", function () {return this._name;});

module.exports = stream;

/**
 * Packaging method based on incoming data
 * @param request
 * request.iRequestId: the request sequence number generated by the framework
 * request.sFuncName: function name
 * request.Arguments: function's argument list
 */
stream.prototype.compose = function (data) {
    var str = JSON.stringify ({
        P_RequestId: data.iRequestId,
        P_FuncName: data.sFuncName,
        P_Arguments: data.Arguments
    });

    var len = 4 + Buffer.byteLength (str);
    var buf = new Buffer (len);
    buf.writeUInt32BE (len, 0);
    buf.write (str, 4);

    return buf;
}

/**
 *
 * After receiving the packet from the network, fill in the data to determine whether the packet is complete
 * @param data The incoming data may be a TCP fragment, not necessarily a complete data request. The protocol parsing class does the data caching work inside.
 *
 * When there is a complete request, the unpacking function throws an event, and the data member of the event needs to be supplemented in the following format:
 *
 * {
 * iRequestId: 0, // Serial number of this request
 * sFuncName: "", // The function name of this request
 * Arguments: [] // List of parameters for this request
 * }
 *
 */
stream.prototype.feed = function (data) {
    var BinBuffer = data;
    if (this._data != undefined) {
        var temp = new Buffer(this._data.length + data.length);
        this._data.copy(temp, 0);
        data.copy(temp, this._data.length);
        this._data = undefined;
        BinBuffer = temp;
    }

    for (var pos = 0; pos < BinBuffer.length; ) {
        if (BinBuffer.length - pos < 4) {
            break;
        }
        var Length = BinBuffer.readUInt32BE(pos);
        if (pos + Length > BinBuffer.length) {
            break;
        }
        var result   = JSON.parse(BinBuffer.slice(pos + 4, pos + Length).toString());
        var request  =
        {
            iRequestId : result.P_RequestId,
			sFuncName  : result.P_FuncName,
            Arguments  : result.P_Arguments
        };

        this.emit("message", request);
        pos += Length;
    }

    if (pos != BinBuffer.length) {
        this._data = new Buffer(BinBuffer.length - pos);
        BinBuffer.copy(this._data, 0, pos);
    }
}

/**
 * Reset the current protocol parser
*/
stream.prototype.reset = function () {
     delete this._data;
     this._data = undefined;
}
The client uses the protocol parser to call the server code:
var Tars      = require("@tars/tars").client;
var Protocol = require("./ProtocolClient.js");

var prx      = Tars.stringToProxy(Tars.ServantProxy, "test@tcp -h 127.0.0.1 -p 14002 -t 60000");
prx.setProtocol(Protocol);
prx.rpc.createFunc("echo");

var success = function (result) {
    console.log("success");
    console.log("result.response.costtime:",  result.response.costtime);
    console.log("result.response.arguments:", result.response.arguments);
}

var error = function (result) {
    console.log("error");
    console.log("result.response.error.code:",    result.response.error.code);
    console.log("result.response.error.message:", result.response.error.message);
}

prx.rpc.echo("tencent", "mig", "abc").then(success, error);
In addition, if you want to request a fixed machine based on a certain characteristic, you can use the following method:
prx.getUsrName (param, {
    hashCode: userId
}). then (success, error) .done ();
After obtaining the client proxy object, the server-side interface function is called. At this time, the hashCode parameter can be passed in. Tars will allocate the request to a fixed machine in the connection list according to the hashCode. have to be aware of is:
- The userId here is a number, which can be binary, octal, or hexadecimal, but the number converted to decimal is preferably less than 16 digits. JavaScript has a problem of losing precision when dealing with high-precision numbers.
- When the server machine list is fixed, the same hashCode will be assigned to a fixed machine. When the server machine list changes, the machine corresponding to the hashCode will be reassigned.
Tars as a Third Party Agreement
First implement the RPC function processing class, pay attention to the framework’s distribution logic:
A. If the function name passed from the client is a function of the processing class, then the framework limitedly calls the corresponding function
B. If the function passed from the client is not a processing function, then the ** onDispatch function of the processing class is called, and the function is responsible for processing the request
C. If there is no onDispatch function, an error is reported
// Save the file as: EchoHandle.js
var Handle = function () {

}

Handle.prototype.initialize = function () { }
Handle.prototype.echo = function (current, v1, v2, v3) {
    console.log("EchoHandle.echo::", v1, v2, v3);

    current.sendResponse("TX", "TX-MIG");
}

Handle.prototype.onDispatch = function (v1, v2, v3) {
    console.log("EchoHandle.onDispatch::", v1, v2, v3);
}

module.exports = Handle;
Code example of server startup function:
var Tars         = require("@tars/tars").server;
var Protocol    = require("./ProtocolClient.js");
var Handle      = require("./EchoHandle.js");

var svr = Tars.createServer(Handle);
svr.start({
    endpoint : "tcp -h 127.0.0.1 -p 14002 -t 10000",
    protocol : Protocol
});
Tars client related parameters
When Tars client proxy object calls the protocol interface function, the last parameter can be passed in a configuration object:
- dyeing: Dyeing objects, see @tars/dyeing for details.
- context: context object.
- packetType: call type, 1 is one-way request, others are ordinary requests.
- hashCode: Request a hash, which must be a number within JavaScript’s precision security range (Math.pow (2, 53)-1)
Examples
prx.getUsrName (param, {
dyeing: dyeingObj,
context: {xxx: xxx},
packetType: 1,
    hashCode: userId
}). then (success, error);
Setting Exception Node Blocking Policy Parameters
The peer node is considered abnormal when the following conditions are met:
-
Within 60 seconds, the number of timeout calls is greater than or equal to 2, and the timeout ratio is greater than 0.5
-
Number of consecutive timeouts is greater than 5
The anomalous node will be blocked and retry every 30 seconds, and recover if successful.
If you need to modify the blocking strategy, you can call the setCheckTimeoutInfo method, as follows:
proxy._worker.setCheckTimeoutInfo ({
    minTimeoutInvoke: 2, // Minimum number of timeouts for strategy 1
    checkTimeoutInterval: 60000, // Minimum time interval for strategy 1, in ms
    frequenceFailInvoke: 5, // Number of consecutive timeouts for strategy 2
    minFrequenceFailTime: 5000, // Minimum interval time for strategy 2 (minimum interval time from 0th to 5th timeout), unit ms
    radio: 0.5, // Timeout ratio for strategy 1
    tryTimeInterval: 30000, // Exception node retry interval, unit ms
    reconnectInterval: 60000 // Interval between closing and reconnecting when abnormal node connection succeeds but retry fails
})