目录
1. 环境搭建
Tars C++环境搭建参考tars_install.md
2. 服务命名
使用Tars框架的服务,其的服务名称有三个部分:
APP: 应用名,标识一组服务的一个小集合,在Tars系统中,应用名必须唯一。例如:TestApp;
Server: 服务名,提供服务的进程名称,Server名字根据业务服务功能命名,一般命名为:XXServer,例如HelloServer;
Servant:服务者,提供具体服务的接口或实例。例如:HelloImp;
说明:
一个Server可以包含多个Servant,系统会使用服务的App + Server + Servant,进行组合,来定义服务在系统中的路由名称,称为路由Obj,其名称在整个系统中必须是唯一的,以便在对外服务时,能唯一标识自身。
因此在定义APP时,需要注意APP的唯一性。
例如:TestApp.HelloServer.HelloObj。
3. Tars管理系统
用户登录成功后,会进入Tars管理系统,如下图
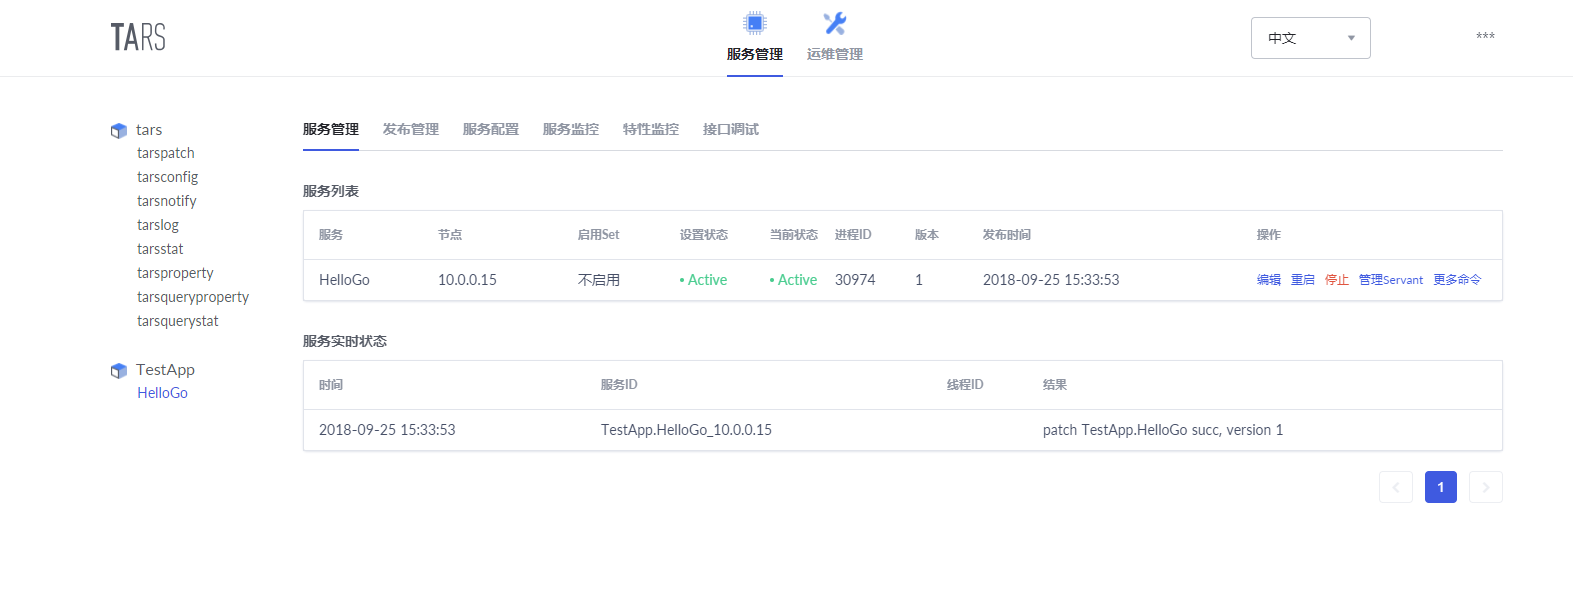
TARS管理系统的菜单树下,有以下功能:
-
业务管理:包括已部署的服务,以及服务管理、发布管理、服务配置、服务监控、特性监控等;
-
运维管理:包括服务部署、扩容、模版管理等;
4. 服务部署
服务部署,其实也可以在服务开发后进行,不过建议先做。
如下图:
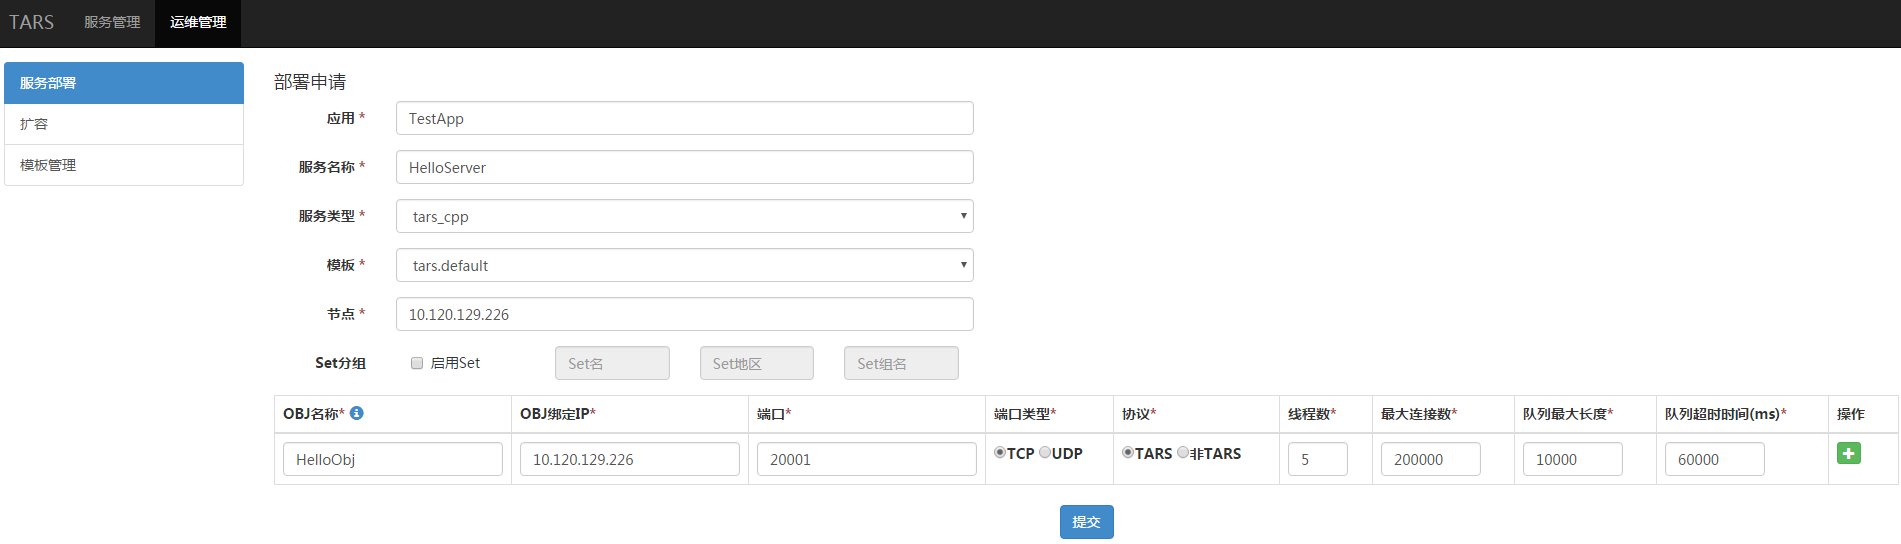
- “应用”指你的服务程序归在哪一个应用下,例如:“TestApp”。
- “服务名称”指你的服务程序的标识名字,例如:“HelloServer”。
- “服务类型”指你的服务程序用什么语言写的,例如:c++的选择“tars_cpp”。
- “模版“ 指你的服务程序在启动时,设置的配置文件的名称,默认用”tars.default“即可。
- “节点“ 指服务部署的机器IP。
- “Set分组“ 指设置服务的Set分组信息,Set信息包括3部分:Set名、Set地区、Set组名。
- “OBJ名称“ 指Servant的名称。
- “OBJ绑定IP“ 指服务绑定的机器IP,一般与节点一样。
- “端口“ 指OBJ要绑定的端口。
- “端口类型“ 指使用TCP还是UDP。
- “协议“ 指应用层使用的通信协议,Tars框架默认使用tars协议。
- “线程数“ 指业务处理线程的数目。
- “最大连接数“ 指支持的最大连接数。
- “队列最大长度“ 指请求接收队列的大小(请求数据在队列中最大个数多了就过载了, 会丢弃)。
- “队列超时时间“ 指请求接收队列的超时时间(请求在队列中等待了当前设置的时间没有处理, 会丢弃)。
点击“提交“,成功后,菜单数下的TestApp应用将出现HelloServer名称,同时将在右侧看到你新增的服务程序信息,如下图:
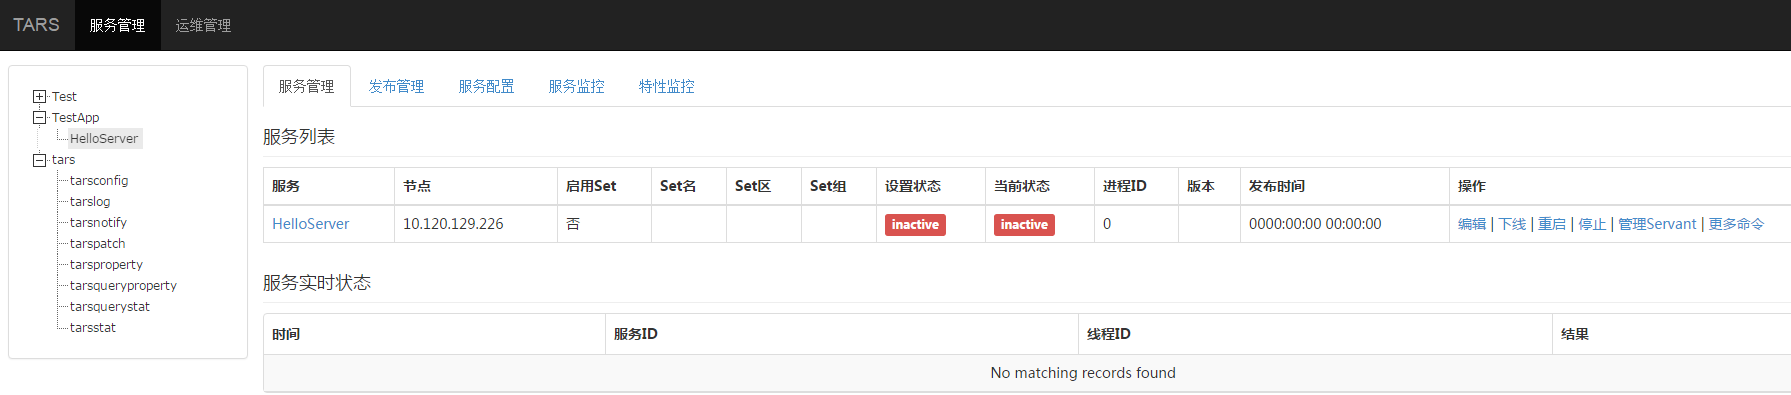
在管理系统上的部署暂时先到这里,到此为止,只是使你的服务在管理系统上占了个位置,真实程序尚未发布。
5. 服务开发
5.1. 创建服务
5.1.1. 运行tars脚本
/usr/local/tars/cpp/script/cmake_tars_server.sh [App] [Server] [Servant]
本例中执行:/usr/local/tars/cpp/script/cmake_tars_server.sh TestApp HelloServer Hello
命令执行后,会在当前目录的TestApp/HelloServer/src 目录下,生成下面文件:
HelloServer.h HelloServer.cpp Hello.tars HelloImp.h HelloImp.cpp CMakeLists
这些文件,已经包含了最基本的服务框架和默认测试接口实现。
5.1.2. tars接口文件
定义tars接口文件的语法和使用,参见tars_tup.md。
如下:
Hello.tars:
module TestApp
{

interface Hello
{
    int test();
};

};
采用tars2cpp工具自动生成c++文件:/usr/local/tars/cpp/tools/tars2cpp hello.tars会生成hello.h文件,里面包含客户端和服务端的代码。
5.1.3. HelloImp是Servant的接口实现类
实现服务定义的tars件中的接口,如下:
HelloImp.h
#ifndef _HelloImp_H_
#define _HelloImp_H_

#include "servant/Application.h"
#include "Hello.h"

/**
 * HelloImp继承hello.h中定义的Hello对象
 *
 */
class HelloImp : public TestApp::Hello
{
public:
    /**
     *
     */
    virtual ~HelloImp() {}

    /**
     * 初始化,Hello的虚拟函数,HelloImp初始化时调用
     */
    virtual void initialize();

    /**
     * 析构,Hello的虚拟函数,服务析构HelloImp退出时调用
     */
    virtual void destroy();

    /**
     * 实现tars文件中定义的test接口
     */
    virtual int test(tars::TarsCurrentPtr current) { return 0;};

};
/////////////////////////////////////////////////////
#endif
HelloImp.cpp:
#include "HelloImp.h"
#include "servant/Application.h"

using namespace std;

//////////////////////////////////////////////////////
void HelloImp::initialize()
{
    //initialize servant here:
    //...
}

//////////////////////////////////////////////////////
void HelloImp::destroy()
{
    //destroy servant here:
    //...
}
5.1.4. HelloServer是服务的实现类
如下:
HelloServer.h:
#ifndef _HelloServer_H_
#define _HelloServer_H_

#include <iostream>
#include "servant/Application.h"

using namespace tars;

/**
 * HelloServer继承框架的Application类
 **/
class HelloServer : public Application
{
public:
    /**
     *
     **/
    virtual ~HelloServer() {};

    /**
     * 服务的初始化接口
     **/
    virtual void initialize();

    /**
     * 服务退出时的清理接口
     **/
    virtual void destroyApp();
};

extern HelloServer g_app;

////////////////////////////////////////////
#endif
HelloServer.cpp
#include "HelloServer.h"
#include "HelloImp.h"

using namespace std;

HelloServer g_app;

/////////////////////////////////////////////////////////////////
void
HelloServer::initialize()
{
    //initialize application here:

    //添加Servant接口实现类HelloImp与路由Obj绑定关系
    addServant<HelloImp>(ServerConfig::Application + "." + ServerConfig::ServerName + ".HelloObj");
}
/////////////////////////////////////////////////////////////////
void
HelloServer::destroyApp()
{
    //destroy application here:
    //...
}
/////////////////////////////////////////////////////////////////
int
main(int argc, char* argv[])
{
    try
    {
        g_app.main(argc, argv);
        g_app.waitForShutdown();
    }
    catch (std::exception& e)
    {
        cerr << "std::exception:" << e.what() << std::endl;
    }
    catch (...)
    {
        cerr << "unknown exception." << std::endl;
    }
    return -1;
}
/////////////////////////////////////////////////////////////////
5.2. 服务编译
进入代码目录,首先做
cd build
cmake ..
make -j4
make HelloServer-tar
5.3. 扩展功能
Tars框架提供了接口定义语言的功能,可以在tars文件中,增加一下接口和方法,扩展服务的功能。
可以修改由cmake_tars_server.sh生成的tars文件,以下3个接口方法中,test是默认生成的,testHello是新增加的接口。
module TestApp
{

interface Hello
{
    int test();
    int testHello(string sReq, out string sRsp);
};

};
使用/usr/local/tars/cpp/tools/tars2cpp hello.tars,重新生成hello.h。
修改HelloImp.h/HelloImp.cpp,实现新的接口代码。
其中HelloImp.h中继承Hello类的testHello方法:
virtual int testHello(const std::string &sReq, std::string &sRsp, tars::TarsCurrentPtr current);
HelloImp.cpp实现testHello方法:
int HelloImp::testHello(const std::string &sReq, std::string &sRsp, tars::TarsCurrentPtr current)
{
    TLOGDEBUG("HelloImp::testHellosReq:"<<sReq<<endl);
    sRsp = sReq;
    return 0;
}
重新make cleanall;make;make tar,会重新生成HelloServer.tgz发布包。
5.4. 客户端同步/异步调用服务
在开发环境上,创建/home/tarsproto/[APP]/[Server]目录。
例如:/home/tarsproto/TestApp/HelloServer在刚才编写服务器的代码目录下,
执行 make HelloServer-release 这时会在/home/tarsproto/TestApp/HelloServer目录下生成h、tars和mk文件。
这样在有某个服务需要访问HelloServer时,就直接引用HelloServer服务make release的内容,不需要把HelloServer的tars拷贝过来(即代码目录下不需要存放HelloServer的tars文件)。
建立客户端代码目录,如TestHelloClient/。
编写main.cpp,创建实例并调用刚编写的接口函数进行测试。
同步方式:
#include <iostream>
#include "servant/Communicator.h"
#include "Hello.h"

using namespace std;
using namespace TestApp;
using namespace tars;

int main(int argc,char ** argv)
{
    Communicator comm;

    try
    {
        HelloPrx prx;
        comm.stringToProxy("TestApp.HelloServer.HelloObj@tcp -h 10.120.129.226 -p 20001" , prx);

        try
        {
            string sReq("hello world");
            string sRsp("");

            int iRet = prx->testHello(sReq, sRsp);
            cout<<"iRet:"<<iRet<<" sReq:"<<sReq<<" sRsp:"<<sRsp<<endl;

        }
        catch(exception &ex)
        {
            cerr << "ex:" << ex.what() << endl;
        }
        catch(...)
        {
            cerr << "unknown exception." << endl;
        }
    }
    catch(exception& e)
    {
        cerr << "exception:" << e.what() << endl;
    }
    catch (...)
    {
        cerr << "unknown exception." << endl;
    }

    return 0;
}
异步方式
#include <iostream>
#include "servant/Communicator.h"
#include "Hello.h"

using namespace std;
using namespace TestApp;
using namespace tars;

class HelloCallBack : public HelloPrxCallback
{
public:
    HelloCallBack(){}

    virtual ~HelloCallBack(){}

    virtual void callback_testHello(tars::Int32 ret,  const std::string& sRsp)
    {
        cout<<"callback_testHello ret:"<< ret << "|sRsp:" << sRsp <<endl;
    }

    virtual void callback_testHello_exception(tars::Int32 ret)
    {
        cout<<"callback_testHello_exception ret:"<< ret <<endl;
    }
};

int main(int argc,char ** argv)
{
    Communicator comm;

    try
    {
        HelloPrx prx;
        comm.stringToProxy("TestApp.HelloServer.HelloObj@tcp -h 10.120.129.226 -p 20001" , prx);

        try
        {
            string sReq("hello world");
            HelloPrxCallbackPtr cb = new HelloCallBack();
            prx->async_testHello(cb, sReq);
            cout<<" sReq:"<<sReq<<endl;
        }
        catch(exception &ex)
        {
            cerr<<"ex:"<<ex.what() <<endl;
        }
        catch(...)
        {
            cerr<<"unknown exception."<<endl;
        }
    }
    catch(exception& e)
    {
        cerr<<"exception:"<<e.what() <<endl;
    }
    catch (...)
    {
        cerr<<"unknown exception."<<endl;
    }

    getchar();

    return 0;
}
编写makefile, 引用刚才/home/tarsproto/APP/Server,如下:
#-----------------------------------------------------------------------
APP         :=TestApp
TARGET      :=TestHelloClient
CONFIG      :=
STRIP_FLAG  := N

INCLUDE     += -I/home/tarsproto/TestApp/HelloServer/
LIB         +=
#-----------------------------------------------------------------------
include /usr/local/tars/cpp/makefile/makefile.tars
#-----------------------------------------------------------------------
make出目标文件,上传到能访问服务器的环境中进行运行测试即可
这里你也可以通过cmake来管理, 也强烈建议你通过cmake管理!
6. 服务发布
在管理系统的菜单树下,找到你部署的服务,点击进入服务页面。
选择“发布管理”,选中要发布的节点,点击“发布选中节点”,点击“上传发布包”,选择已经编译好的发布包,如下图:
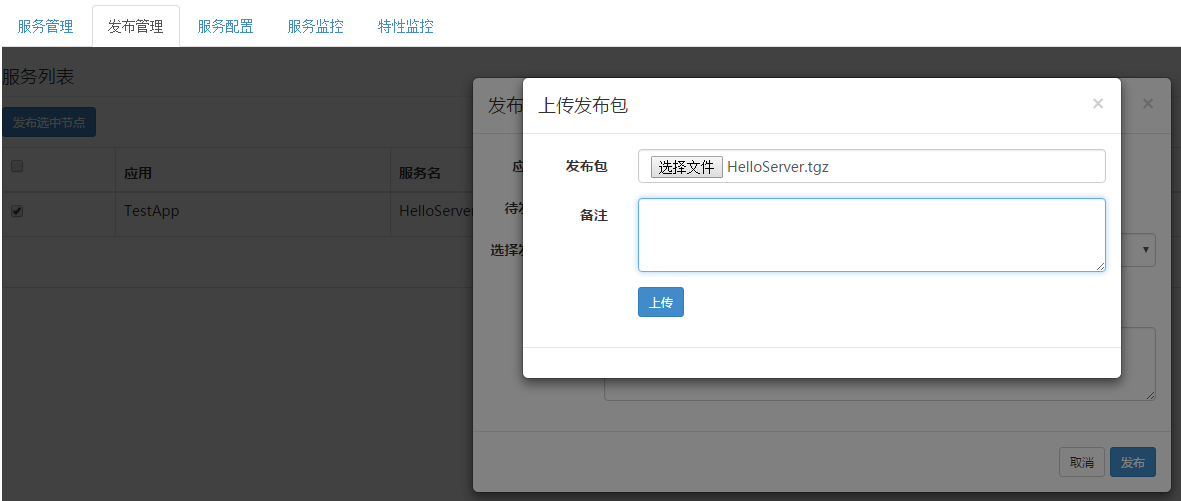
上传好发布包后,点击“选择发布版本”下拉框就会出现你上传的服务程序,选择最上面的一个(最新上传的)。如下图:
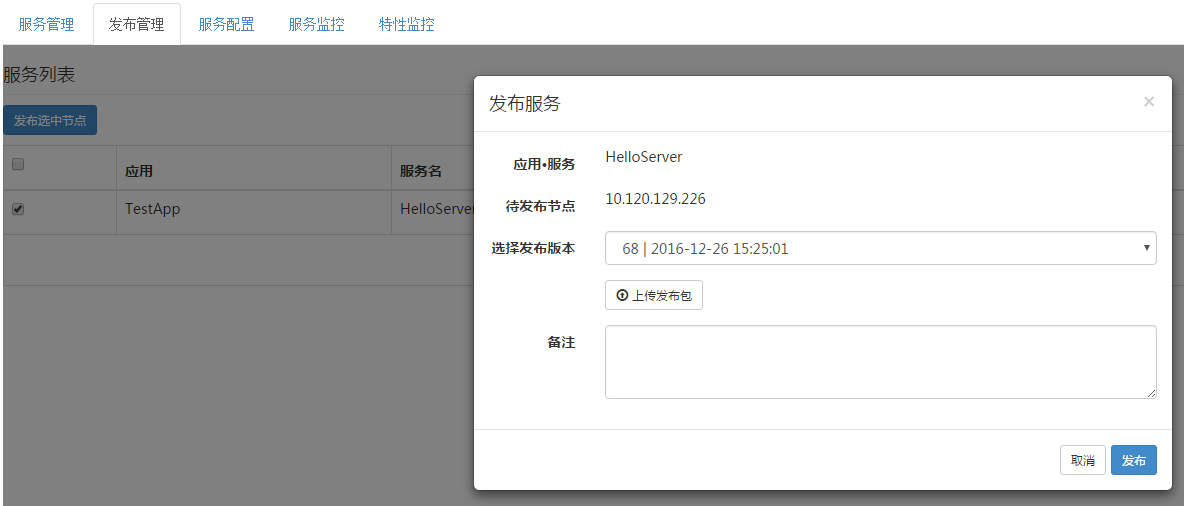
点击“发布”,服务开始发布,发布成功后,出现下面的界面,如下图:

若失败的话,可能是命名问题,上传问题,以及其他环境问题。